Building Customized Input Windows in WiX: Step-by-Step Instructions for Developers

Building Customized Input Windows in WiX: Step-by-Step Instructions for Developers
Inno Setup
WiX Toolset
InstallShield
MSIX Packaging Tool
Check your inbox and confirm the
subscription
Exclusive Newsletter

Get the latest WiX insights direct to your inbox. Subscribe now!
Disclaimer: This post includes affiliate links
If you click on a link and make a purchase, I may receive a commission at no extra cost to you.
How to create a custom dialog in WiX for user input
Written by Renato Ivanescu · June 15th, 2023
During the installation process, user input dialogs play a crucial role by prompting users to provide necessary input. This feature is widely utilized in setup packages as it allows users to provide feedback, and it ensures proper installation and configuration of the software. Additionally, it allows you to store valuable information on the local machine for future use.
Let’s say you have an application, and you want to create an installer package that collects information from the user.
In this tutorial, we’ll show you how to create a custom dialog to let the user provide input. We’ll set it up so that it gets saved in a txt file on the local machine after installing the application.
To achieve this, let’s now directly follow the steps outlined in the upcoming sections.
How to add the setup project?
To add the setup project for your application, go to File → New → Project. From the templates list, choose Setup Project for Wix.

Keep in mind that you need to have the WiX extension added to Visual Studio to find the template. Check this tutorial to see how to add it. There, you’ll also find how to add the deployable files once the Setup Project is created.
Once you add the WiX extension and the deployable files, you have to edit the Product.wxs file and add the next line to reference the UI element we will use in this tutorial.
<Product Id = “*” … >
Copy
How to create the installer dialogs?
Now, we are ready to create the dialogs for our installer package. A dialog is a Windows Installer XML file. We will create two dialogs for our installer package:
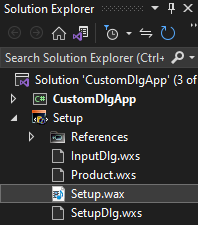
- A welcome dialog → SetupDlg.wxs
- A dialog for the user input → InputDlg.wxs
To create a dialog, follow the next steps:
- Right-click on the Setup Project → Add → New Item.
- Go to the WiX section and choose Installer File.
- Name it and click the Add button.

After you create the two dialogs, you should find them in the Solution Explorer under the Setup Project.

How to customize the installer dialogs?
Once the installer dialogs are created, you have to add the controls.
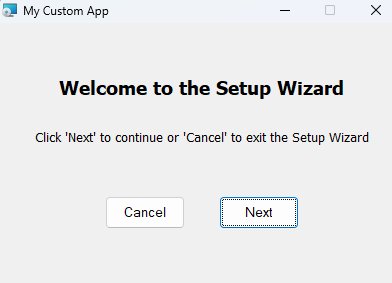
1. The welcome dialog from our example includes:
- Static texts
- Two buttons: Cancel (cancel the setup) and Next (proceed to the next dialog)

For this dialog, you can use the following code.
Copy
2. The input dialog includes:
- Static texts
- Two edit boxes for the user input
- Two buttons: Cancel (cancel the installer) and Install (will start installing the application)

For this dialog, add the code below.
Copy
How to save the user input in a txt file?
Now, we have to take the information from the input dialog and save it in the txt file. For this, we will use a custom action. To create it, follow the steps:
1. Go to Files → New → Project and search for C# Custom Action Project for WiX.

2. Next, add the following code to create the custom action:
public class CustomActions
    [CustomAction]
    public static ActionResult SaveUserInput(Session session)

        string email = session["EMAIL"];
        string password = session["PASSWORD"];
        string appdataPath = "C:\\Users\\Caphyon";
        if (!Directory.Exists(appdataPath + "\\UserData"))
            Directory.CreateDirectory(appdataPath + "\\UserData");
        File.WriteAllText(appdataPath + "\\UserData\\InputInfo.txt", email + "," + password);
        return ActionResult.Success;
Copy
As you can see, in order to store the user information, the custom action uses the Property attribute values of the emailTextBox and passwordTextBox control elements. The collected information will be written to a text file called InputInfo.txt and saved in the directory C:\Users\Caphyon\UserData.
3. After creating the custom action, you need to reference it in the Setup Project.
To do this, right-click on the Setup Project → Add → Reference. In the Add Reference dialog, go to the Projects tab and select the custom action that you created previously. Press the Add button and then the Ok button.

Build and install the project
After completing all the above steps, all you have to do is build the project and run the installer package.
Enter the data into the text fields you added to the input dialog and click on the install button. After the installation is complete, you should be able to locate the text file that contains the information you entered in the text boxes.
Conclusion
Designing user input dialogs in WiX can be challenging, particularly for complex scenarios like client-type applications. These cases often involve gathering and storing essential information, such as server address, port number, and firewall settings, in the registry. Editing the .wxs files to incorporate all the controls and create custom actions can be time-consuming.
A more streamlined and effective approach is to leverage a GUI-based tool. Advanced Installer provides an intuitive graphical user interface that simplifies the process of adding controls to dialogs. You can conveniently configure the controls directly from the user interface, saving you valuable time and effort.
Advanced Installer #1 alternative to the WiX Toolset
We decided to focus on our main goal to save precious time of our developers.
HANS-LEO TEULINGS
PHD – CEO, NEUROSCRIPT, LLC
You might find useful:
- CAB Embedding Options in MSI
- Updated installers in WiX Toolset
- Custom Actions In WiX Toolset
- Windows Services with WiX Installer
- Set WiX Installer Version to the Current Build Version
- Remove Files and Folders when Uninstalling with WiX
- How to set a WiX Toolset custom action to run only on uninstall
- How to create non-advertised shortcuts for all users / per machine with WiX Toolset
- How to Remove Files on Uninstall Using WiX Toolset
- How to create major upgrades for MSI packages using WiX Toolset
- How to pass CustomActionData to a CustomAction using WiX
- How to build an installer without a license page using WiX Toolset
- How to create a WiX KeyPath attribute
- How to Create a Desktop Shortcut using WiX Toolset
- How to Use WiX MSI to Update an Installed Application
- How to correctly set the install folder in Wix
- WiX Toolset Visual Studio Extension
- How to create a custom dialog in WiX for user input
- How to create an MSI installer with WiX
- How to use WIX MSI to do a silent install or uninstall of a web app
Get the most from packaging with Advanced Installer
Try the 30-day fully-featured edition absolutely free!
No credit card required
Also read:
- [New] 2024 Approved Leveraging Virtual Board Features for Enhanced Collaboration in Zoom
- [New] Enhance Efficiency, Engage Creativity with Mematic for 2024
- [Updated] In 2024, Screen Surfing Simplified Navigate with Netflix's PIP
- 2024 Approved Desktops in Focus - Free Capture Tutorials
- ABBYY's Latest SDK Revolutionizes Receipt Digitization with Cutting-Edge Features
- Adrian Jones Appointed as New Chief Revenue Officer at ABBYY
- Advanced Analytics Driven by Innovative Cookiebot Solutions
- Banish the Blue Screen: Troubleshooting 'storahci.sys'
- Boost Your Site with Cookiebot Technology - A Comprehensive Tracking Solution
- Cookiebot-Driven Personalization: Boosting User Engagement and Analytics
- Cookiebot-Driven Site Optimization: Elevate Your SEO Game
- Cookiebot-Enabled Sites: Enhance User Experience & Track Visitors Effectively
- Cookiebot-Enabled User Tracking & Analytics
- Cookiebot-Enabled: Enhancing User Experience with Smart Tracking Solutions
- How to Quickly Update Your PC's Intel 82579LM Driver
- How To Remove Passcode From Apple iPhone 6s? Complete Guide | Dr.fone
- In 2024, Maximizing YouTube Earnings Master the Art with 500 Subscribers
- Quick Troubleshooting Guide to Fix ?-Icon on MacOS
- Quintessential Radio Narrative Craftsmanship
- Title: Building Customized Input Windows in WiX: Step-by-Step Instructions for Developers
- Author: Donald
- Created at : 2024-09-26 16:30:04
- Updated at : 2024-10-03 18:47:41
- Link: https://some-tips.techidaily.com/building-customized-input-windows-in-wix-step-by-step-instructions-for-developers/
- License: This work is licensed under CC BY-NC-SA 4.0.