Efficient File Removal Techniques with Windows PowerShell Commands

Efficient File Removal Techniques with Windows PowerShell Commands
Quick Links
- Before You Begin: How to Find a File or Folder’s Full Path
- How to Delete a Specific File Using PowerShell
- How to Delete a Specific Folder Using PowerShell
- How to Delete All Files in a Folder But Keep the Folder
- How to Delete All Files From a Folder and Its Subfolders
- How to Delete Files With Wildcards
Key Takeaways
- To delete a file or folder, use the “Remove-Item PATH” cmdlet in PowerShell. In this command, replace “PATH” with the full path to the file or folder you want to remove.
- To delete all files in a folder but keep the folder, use the “Remove-Item PATH\*.*“ command, where “PATH” is the full path to the folder.
- To remove all files from a folder and its subfolders, use the “Remove-Item PATH -Recurse -Include *.*“ command, replacing “PATH” with the full path to your parent folder.
PowerShell offers a straightforward way to delete files and folders on your Windows 11 or Windows 10 PC. You can remove folders, all files inside a folder, specific files from the specified directory, and so on using just a few commands. Here’s how to do that.
Before You Begin: How to Find a File or Folder’s Full Path
To remove files or folders from your Windows PC, you’ll need the item’s full path. If you know how to get file or folder paths , skip to the relevant section below. If you aren’t sure how to copy a file or folder’s full path, we’ll show you how.
First, open a File Explorer window and locate the file or folder whose path you want to find. Then, hold down the Shift key on your keyboard, right-click your file or folder, and choose “Copy as Path.”
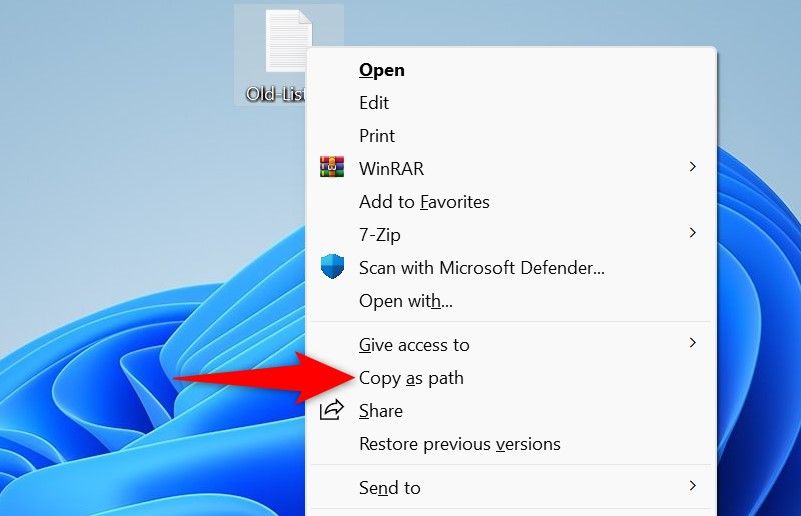
You’ve successfully copied the selected item’s path to your clipboard. You can now paste this path (using Ctrl+V) wherever required within the PowerShell window.
How to Delete a Specific File Using PowerShell
To remove a specific file from your PC, use PowerShell’s “Remove-Item” cmdlet .
Start by opening a PowerShell window on your PC . Here, type the following command, replace “PATH” with the full path to the item you want to delete, and press Enter:
Remove-Item PATH
As an example, to delete a file named “Old-List.txt” on your desktop, you’d run:
Remove-Item “C:\Users\username\Desktop\Old-List.txt”
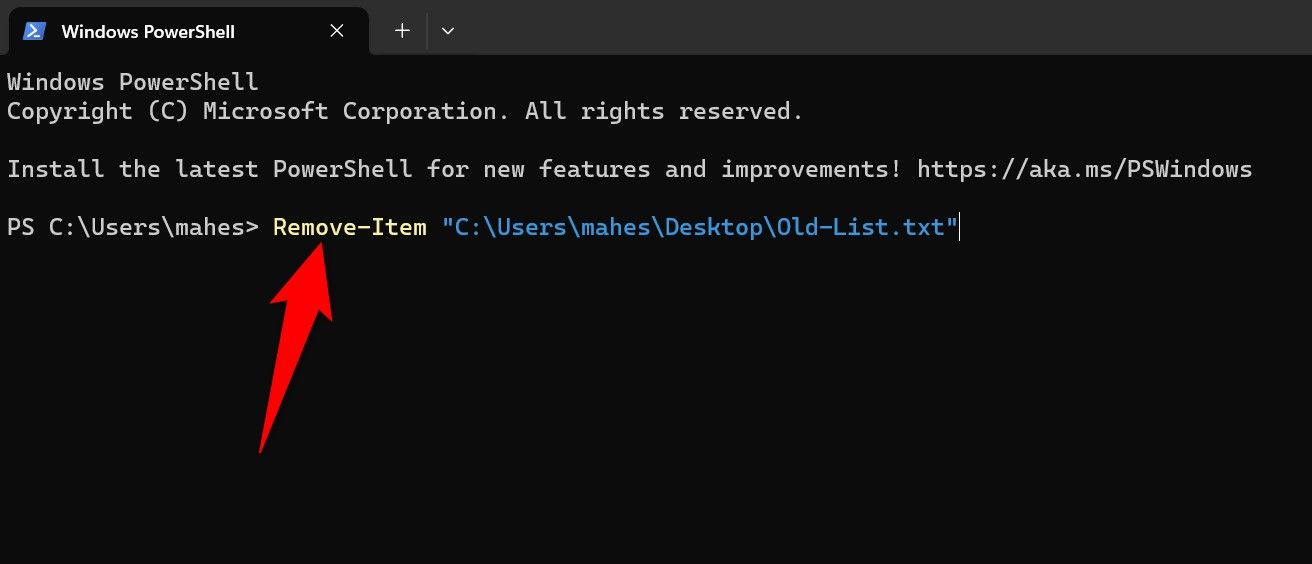
Note that the command won’t ask for a confirmation before deleting your file. If you’d like the command to do that, add the “Confirm” parameter as follows:
Remove-Item “C:\Users\username\Desktop\Old-List.txt” -Confirm
How to Delete a Specific Folder Using PowerShell
You can use PowerShell’s “Remove-Item” cmdlet to remove any directory from your PC.
Deleting a folder removes all the subfolders and files inside it.
To start, launch PowerShell, type the following command, replace “PATH” with your directory’s full path, and press Enter:
Remove-Item PATH
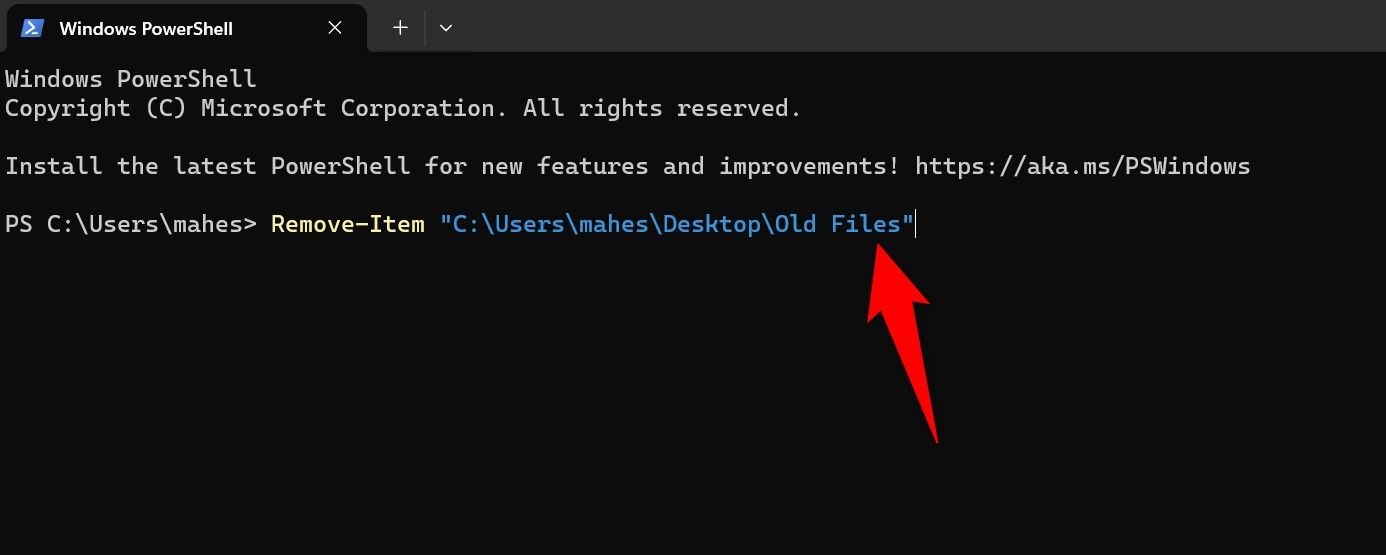
As an example, to delete a directory named “Old Files” from your desktop, you’d run:
Remove-Item “C:\Users\username\Desktop\Old Files”
How to Delete All Files in a Folder But Keep the Folder
If you want to remove all files from a folder but retain the folder, use the “Remove-Item” cmdlet as follows.
In your PowerShell window, type the following command, replace “PATH” with the full path to the folder you want to empty, add “\*.*“ before the final quotation mark, and press Enter:
Remove-Item PATH*.*
For example, to delete all files from a folder named “Your Files” from the desktop, run:
Remove-Item “C:\Users\username\Desktop\Your Files*.*”
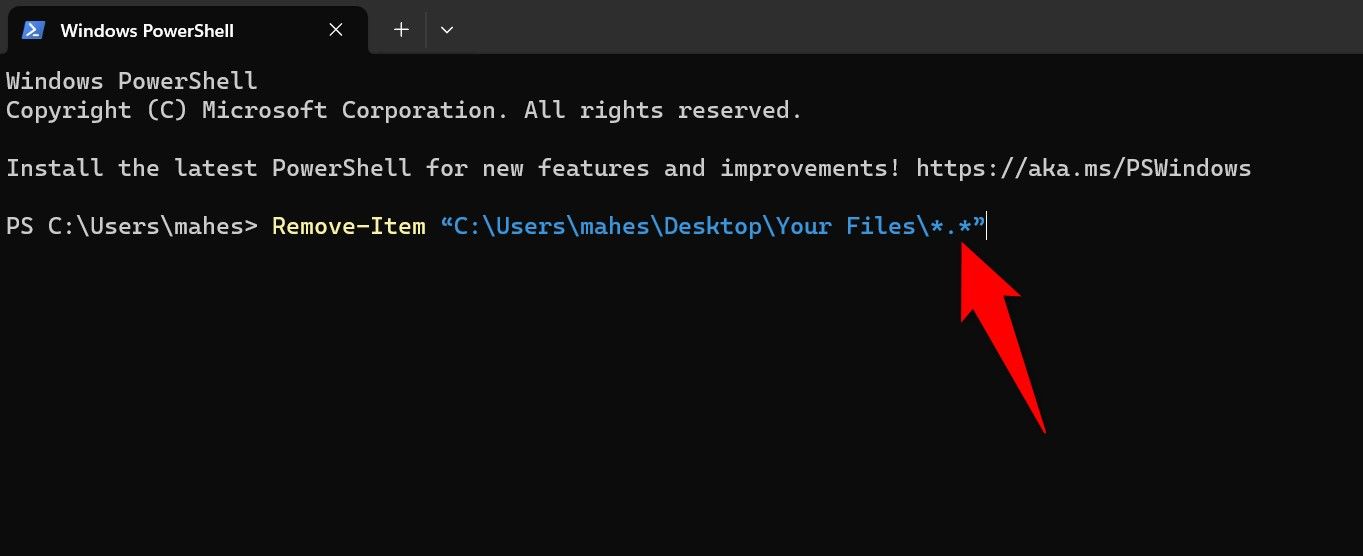
In this command, the first asterisk selects files with any name, and the second asterisk chooses files with any extension. This translates to selecting all the files in the specified folder.
How to Delete All Files From a Folder and Its Subfolders
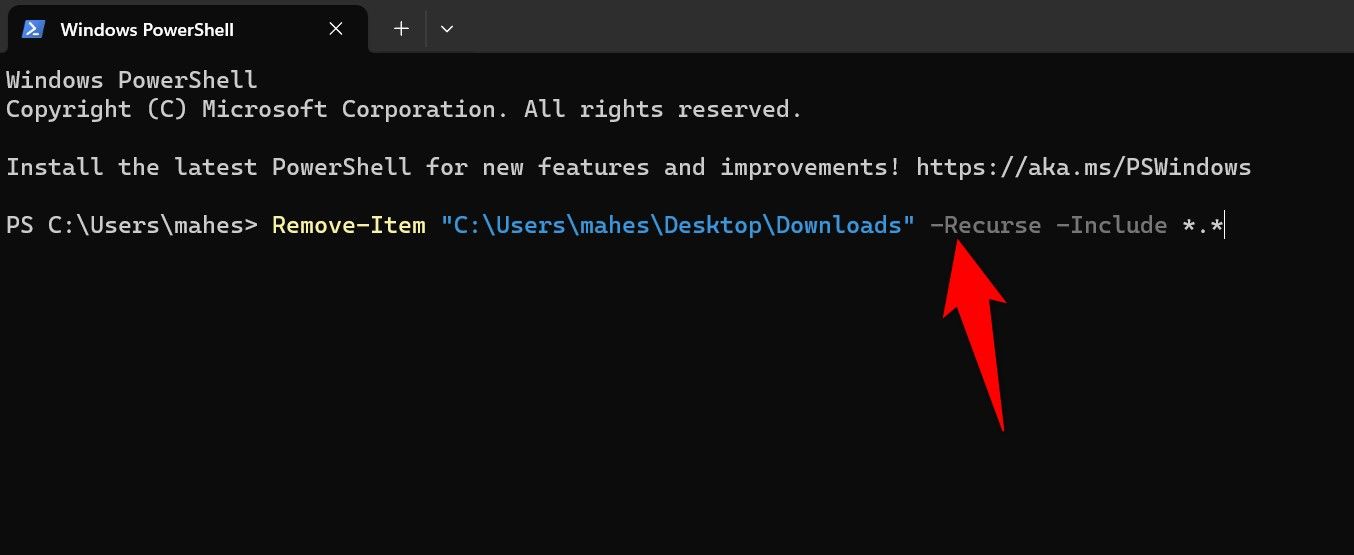
If you’re looking to remove all files from a folder and its subfolders, add the “Recurse” and “Include” parameters to the “Remove-Item” cmdlet.
Open a PowerShell window, enter the following command, replace “PATH” with the full path to the folder, and press Enter:
Remove-Item PATH -Recurse -Include .
Here, the “Recurse” parameter ensures the subfolders’ files are deleted as well. The “Include” parameter ensures files with any name and extension are removed.
As an example, to remove all files from the “Downloads” folder and its subfolders on the desktop, run:
Remove-Item “C:\Users\username\Desktop\Downloads” -Recurse -Include .
How to Delete Files With Wildcards
PowerShell offers wildcards, allowing you to delete various kinds of files by just specifying those file types in your command. In all the examples below, replace “PATH” with the full path to your folder.
For example, if you want to remove all the JPG files from a folder, use the following command:
Remove-Item PATH -Include *.jpg
Another use of wildcards is to delete all but a specific file type from your directory. For example, to remove all files except for PDF files from a folder, use the following command:
Remove-Item PATH -Exclude *.pdf
Another advanced use of PowerShell is to remove all empty folders from the given directory. In this case, use the following command, replacing “PATH” with the full path to the directory:
Get-ChildItem -Recurse PATH | where { $.PSISContainer -and @($ | Get-ChildItem).Count -eq 0 } | Remove-Item
And you’re set.
Now that you know how to delete items with PowerShell, you won’t be stuck when File Explorer refuses to work. PowerShell offers more ways than File Explorer to help you remove content, like the ability to only remove specific files with a single command.
Also read:
- [Updated] Leveraging Video for Maximum Impact with These 5 YouTube Strategies for 2024
- [Updated] The Art of Precision Introducing an OBS Countdown Timer
- 2023'S Must-Have Technology Picks From Best Buy Featured by ZDNet
- Advanced Editing Perfecting Transitions in Kinemaster for 2024
- Apple Vision Pro Assessment: The Verdict at $3,500 - Comprehensive Insights From Experts
- Audio Recording Made Easy Free X-Recorder for PC for 2024
- Breaking News: IPhone 16'S Camera Tech Sets New Standards, Eclipsing Historic Color Transition According to Latest ZDNET Analysis
- Cost Breakdown for Apple Vision Pro in Extended Reality (XR) Investment Strategies | NextGenTech Insights
- Dose Life360 Notify Me When Someone Checks My Location On Oppo A79 5G? | Dr.fone
- Escape the Monotony: Exploring How the Metaverse May Revolutionize Your Future Job Opportunities | ZDNET
- Exploring the Disbelief: Is There Truth to Reports of Apple's Upcoming AR/VR Headset? - A ZDNet Analysis
- Grizzly Introduces Revolutionary Phase-Shifting Heat Pad: Transforms From Solid to Liquid at 45°C
- How to Swiftly Attach a Soundtrack to Your MP4 File in Minutes
- In 2024, For People Wanting to Mock GPS on Vivo Y100t Devices | Dr.fone
- In 2024, How to Cast Samsung Galaxy XCover 7 to Computer for iPhone and Android? | Dr.fone
- Synergizing Progress: How Artificial Intelligence & 5G Are Revolutionizing Technology
- Why I Switched to Cost-Effective XR Headsets Over Apple Vision Pro and Meta Quest Vee | Expert Review on ZDNET
- Title: Efficient File Removal Techniques with Windows PowerShell Commands
- Author: Donald
- Created at : 2025-01-17 17:36:25
- Updated at : 2025-01-24 16:18:49
- Link: https://some-tips.techidaily.com/efficient-file-removal-techniques-with-windows-powershell-commands/
- License: This work is licensed under CC BY-NC-SA 4.0.