![[New] Transform Your iPhone Snaps Into Stunning HDR Photos](https://thmb.techidaily.com/06629510e11e9d29470adf181e231bb23d34ab4b20d9291b76fb465837bc25f3.jpg)
[New] Transform Your iPhone Snaps Into Stunning HDR Photos
Transform Your iPhone Snaps Into Stunning HDR Photos
Are you annoyed that your iPhone camera is unable to capture what your eyes see? Well, no need to waste your energy. The iPhone camera offers just the perfect feature to counter this problem - the HDR feature.
Most people have to use photo editing software to fix the exposures of photos, but luckily for us, we don’t need that.
In this article, we will give you a brief overview of HDR photography and then guide you on how to shoot HDR photos with an iPhone.
Part 1: What is HDR Photography for iPhone?
HDR is short for High Dynamic Range, and it refers to a photography technique where multiple exposures of a scene are combined to create one well-lit picture. It captures a scene’s darkest and lightest tone and shows them as such in the final photo.
Apple introduced the HDR feature back in 2010 on iPhone 4. It was a breakthrough for the company, further enhancing the iPhone camera. Since then, all the succeeding models of the iPhone have the HDR feature.
However, Apple has advanced its HDR technology with the passage of time. Before the release of the iPhone 12, Apple worked with HDR10. With the iPhone 12, Apple inculcated Dolby Vision HDR, becoming the first to roll out Dolby Vision in a mobile handset.
Without the HDR feature, your iPhone camera is not capable of capturing a high-contrast scene. This will lead you to having exposure problems in your pictures.
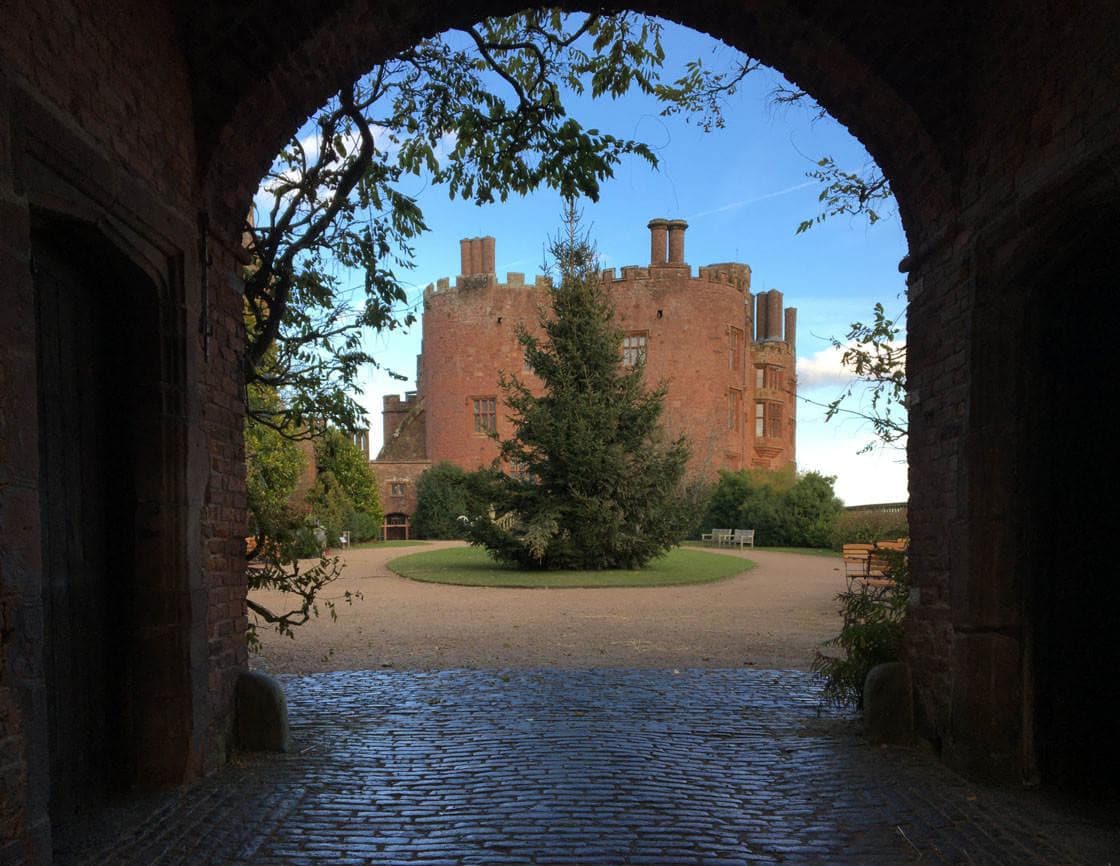
Your scene might have dark tones that are well exposed with the right colors and details, but the bright areas might be over-exposed with no shade or detail.

On the other hand, your scene might have bright tones that are well-exposed with the right color and details, but the dark areas are too dark to show the details.
Alt text: HDR shoot with different exposure
With the iPhone’s HDR feature, you can get a perfectly exposed photo showing details simultaneously in light and dark tones.
Part 2: How to take an HDR Photo with your iPhone Camera?
Now that we know how HDR helps make our pictures pop out, let’s look at how you can take an HDR photo with your iPhone camera.
How to take HDR photos on iPhone X, iPhone 11 models, and iPhone 12 models?
Here is a step-by-step guide for you to follow. This guide is applicable for iPhone XS, iPhone XR, iPhone 11 models, and iPhone 12 models.
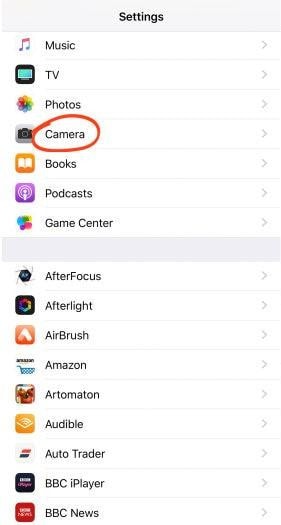
Step1Go to Settings
The first step for you is to go to your iPhone Settings. Here, click on the Camera app.


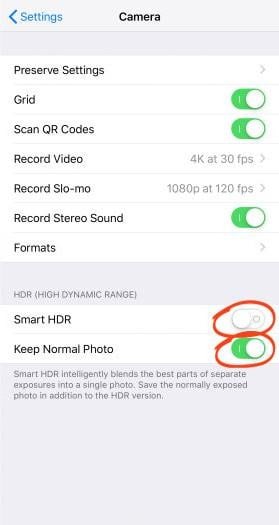
Step2Adjust the Settings
Here, ensure that the Smart HDR (or Auto HDR in iPhone 8, iPhone 8 Plus, and iPhone X) is toggled off. The HDR option will not be available in the camera if you do not switch this off.

Also, ensure that the “Keep Normal Photo” toggle is on. Having this enabled will let your camera save a non-HDR version of the photo as well as the HDR version.
Step3Head to the Camera App
Once you have adjusted the setting, open the Camera app.
Step4Enable HDR
At the top of the screen, you will see an HDR option. Tap on it to enable (or disable) it.

In older iPhones such as iPhone 7, iPhone 7 Plus, and earlier, you have the option to set it to Auto, On, or Off. Choose the “On” option.
You can now take HDR photos with your iPhone!
How to take HDR Photos on iPhone 13?
In the iPhone 13 models, the steps for taking an HDR photo are slightly different. The first few steps are the same. Go to Settings > Camera. Under the HDR section, find the “HDR” option and turn the toggle on.
Once the toggle is on, go to the Camera app. You will see the HDR option where you can turn it On/Off or set it to Automatic.
Part 3: How Not to Have Two Same Photos When Shot with HDR on your iPhone?
You may notice that when you shoot photos with HDR on your iPhone, your camera roll shows two identical pictures. This happens when the “Keep Normal Photo” setting is enabled in the iPhone Camera Settings. This setting is only available on iPhone X and earlier.
For the latest versions, you can only see the Smart HDR option. By default, Smart HDR does not save the non-HDR version of the image.
The “Keep Normal Photo” option is helpful in instances where you might have to compare the HDR and non-HDR versions. You may even prefer the non-HDR version in some cases.
But the side effect of this feature is that it becomes a nuisance to delete the other versions, and it also takes up space.
Here is how you can disable this setting and avoid having two same photos.
Step1Go to Settings
Go to your iPhone Settings and tap on the Camera app.
Step2Disable the “Keep Normal Photo” Option
You will see a “Keep Normal Photo” toggle in the HDR panel. Turn the toggle off.
Once the toggle is off, you can go and take an HDR photo. The camera app will no longer save the non-HDR version of the image.
 Glarysoft File Recovery Pro Annually - Helps to recover your lost file/data, even permanently deleted data.
Part 4: iPhone Camera Smart HDR Not Working, Why?
The iPhone’s HDR option enables you to get great shots. Apple introduced a “Smart HDR” option on iPhone where the camera shoots photos in HDR (when necessary) by default. This option ensures that users don’t have to go to great lengths to get amazing shots.
However, there may be instances when you feel that the “Smart HDR” option is not working.

Scenario 1: No HDR toggle option in the Camera App
There may be a case where you open your Camera app to take a picture in HDR but there is no HDR option available to you. This is usually the case with iPhone 13 models, and its pro variants.
Well, the reason behind it is that Apple has added a new feature in these models that the Camera is set to capture HDR shots by default. So, users do not have the option to control the HDR feature.
It certainly takes away the control that users had in their shots because not all HDR images turn out to be perfect. Especially while zooming into things, the images start looking like a painting. However, it works just fine in most cases.
Scenario 2: No HDR feature for Photos enabled in iPhone XS Max
Certain iPhone XS Max users are facing a problem where the Photos app does not show whether the image is an HDR image or not. Previously, users could see an “HDR” tag on their photos. However, recently the tags are not visible anymore.
Worry not, this does not mean that your Smart HDR is not working. You can check this by disabling Smart HDR from Settings > Camera. Once Smart HDR is disabled, go to the Camera app and take a picture without HDR. Compare the before and after images to see if your HDR feature is working or not.
Such instances of Smart HDR may occur but you don’t need to worry too much about them. The simple solutions mentioned above will surely fix your problem. In case they don’t help, you can contact the Apple Support to get your queries resolved.
Part 5: Video Guide HDR on your iPhone device
HDR photography is a really cool technique that can really make your content more appealing. We have provided you with all the necessary information regarding HDR photography on your iPhone.
However, if you still have any queries, here is a link to a very useful video.
How to use HDR with an iPhone X
Final Words
iPhones all around the world are known for their fantastic camera results. With each new model of the iPhone, Apple tends to introduce some cool new features, such as the HDR feature.
Although iPhones have had the HDR feature for some time now, its usage has only increased recently as the trend of aesthetic photography has come forth.
This article perfectly sums up all the information you need in order to capture amazing HDR photos. So, go on and get shooting!
Free Download For Win 7 or later(64-bit)
Free Download For macOS 10.14 or later
- Title: [New] Transform Your iPhone Snaps Into Stunning HDR Photos
- Author: Donald
- Created at : 2024-08-21 15:59:59
- Updated at : 2024-08-22 15:59:59
- Link: https://some-tips.techidaily.com/new-transform-your-iphone-snaps-into-stunning-hdr-photos/
- License: This work is licensed under CC BY-NC-SA 4.0.